


How to Paint Brake Calipers with a Brush
How to Paint Brake Calipers with a Brush
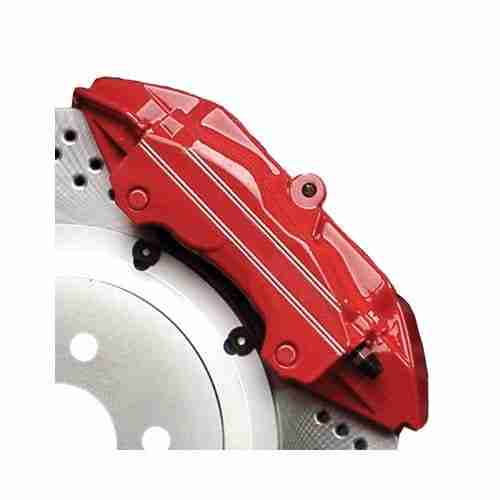
Sometimes people want change, but they can’t go as far as to buy a new car. Or, maybe you really like your car, and want to give it some more personality! Painting your brake calipers is a great way to give an added level up customization to your vehicle. There are a couple of ways to do this, but this article will cover how to paint brake calipers with a brush. Using a brush is the best method to ensure even coverage and will make the paint less likely to flake as time passes.
 1. Ensure that your car is placed in park

As with any time you do work on your vehicle, ensuring your safety is an integral step! Before moving on to the next steps, it is essential to make sure that your vehicle is locked down and not going to roll anywhere.
2. Unfasten the lug nuts
Before lifting your vehicle with a jack, you must first unfasten the lug nuts on the wheel of your car. To do this, you can use a tire iron or an impact wrench if they are stuck and giving you a hard time!
3. Position a jack underneath your car
Lift your car off of the ground by using a jack. To ensure that you have put your jack in a safe position – be sure to check your vehicle owner’s manual!
- Gently lower the vehicle down on to the stand
- Remove the jack from the stand and leave the car placed on the lift
4. Unfasten the Lug Nuts Entirely
Once all of the Lug Nuts have been taken off, slowly remove the tire by moving it towards you until it comes off. Make sure that you are setting the Lug Nuts in a place where they will not become lost!
5. Complete the above steps for all wheels on the vehicle
Keep in mind that the process will take a little bit longer if you do not have the amount of jack stands necessary to do all of the tires at once. This isn’t an issue, and is merely a matter of convenience!
Prepare the Calipers
1. Remove the calipers
Most of the time the calipers are secure in their position by a couple of bolts towards the back of the wheel. Most people find that a ratchet wrench is the best tool for removing the bolts that hold the calipers in place.
- Do not remove the calipers from the break like – be sure that you keep them attached!
- Ensure not to damage the brake hose
2. Remove the caliper from the brake pad
Brake pads are usually held in place by a clip. Search for the mechanism that is securing the caliper to the brake pads and carefully remove it to ensure that you do not cause damage. This is an important step in ensuring safety and will prevent you from getting paint on the brake pads. Getting paint on the brake pads may reduce the function of your breaks.
3. Make sure that you clean the calipers well
Properly cleaning your calipers will ensure that all of this effort will last. If you paint over dirt and debris, you are putting the calipers at risk for rust and paint flaking in the future.
- Use a wire brush to remove any stuck on debris
- Only do this on the metal parts, stay away from the rubber!
- Use a spray-on brake cleaner to remove any dirt loosened by the wire brush
- Use newspaper and tape to cover up the areas that you aren’t painting
Doing this will ensure that the paint is only going where you want it to, and will result in a nice and neat looking finished result. You don’t want to put in all of this effort to end up with a sloppy looking paint job!
5. Get your paint and brush ready
It is important not to get the paint mixed too soon, waiting until you are ready to do the painting is ideal! This step prevents the paint from drying out and getting clumpy.
You should use a brush that is a ½ inch in diameter. This will allow you to make sure that you have more control over where the paint is going and will allow for greater detail!
6. Start painting!
When learning how to paint brake calipers with a brush, it can be intimidating! Lightly painting on multiple coats of paint will help you to minimize the chances of ending up with air pockets and bubbles in the finished result. Ideally, you should let each coat of paint dry for about 15 minutes!
Reattaching the Brake Calipers
- Before you reattach the brake calipers, it is important that everything has thoroughly dried! The amount of time that this takes can vary a bit due to factors like temperature and humidity, but the general rule of thumb is to wait at least 24 hours!
- After everything is dry, you can begin to remove the paper and tape from the areas surrounding the caliper. Do this step carefully to ensure that you are not pulling any paint off with the tape!
- After everything is removed, the next step is to reattach the calipers to the brake pads. Be sure that you are doing this correctly, and consult with a professional if you aren’t sure of what you are doing.
- Once you have successfully completed the steps above, go ahead and reattach the wheels!
- Lower the vehicle back down to the ground and remove the jack
You’re ready to ride!
When you first get your vehicle back on the road make sure that you are letting your brakes warm up slowly! Avoid any hard stops and make sure that you are stopping gently. Doing this allows the heat from the breaks to set the new paint job – and gives you a chance to make sure that everything is functioning correctly after being reattached.


No Comment