How to Remove Scratches From Black Plastic Bumpers
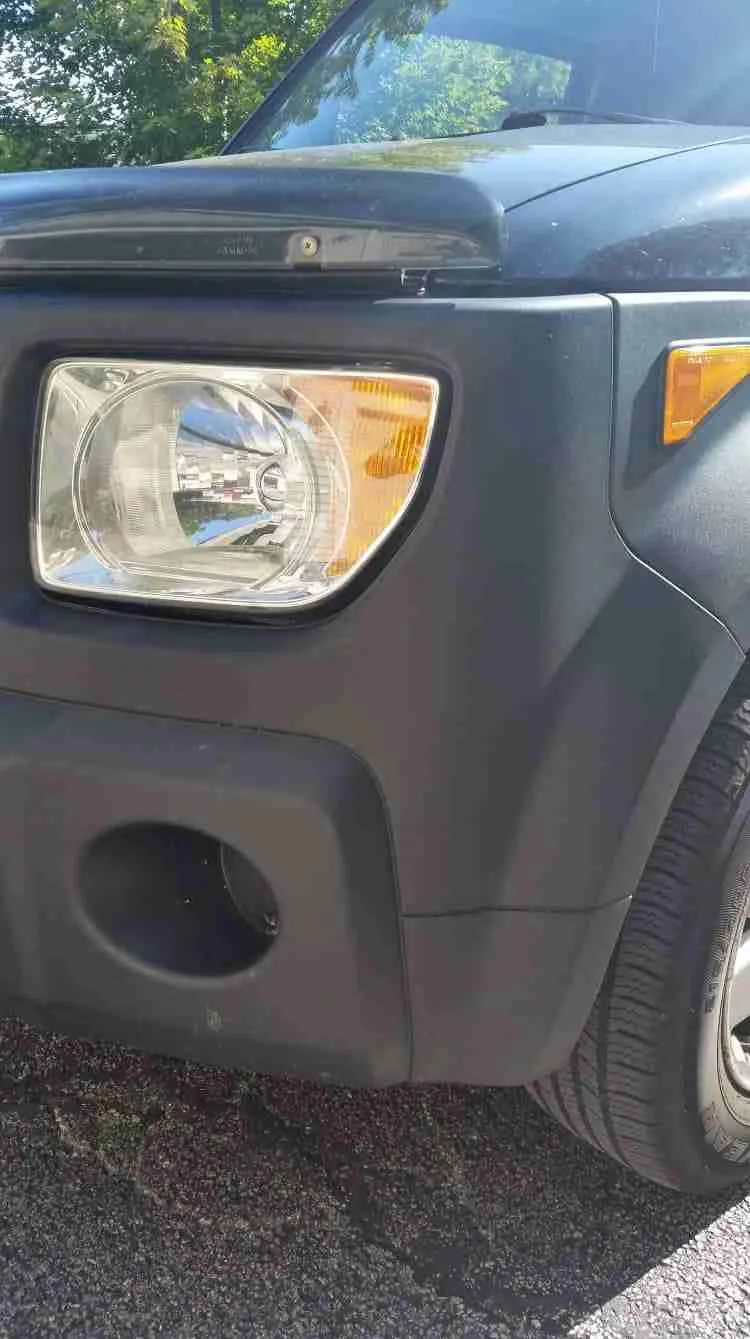
A Guide to Removing Scratches from Black Plastic Bumpers
 Black plastic bumpers are a common feature of cars, boats, and motorbikes. Black trim is a popular option due to its versatile nature; it blends well with the color scheme of any vehicle, and it’s a cheap, effective means of protecting the exterior of your car.
It’s an unfortunate occurrence, but as we all know – accidents happen. A careless driver can scratch your bumper in the mall parking lot as they try to navigate their way into the parking spot next to you. Perhaps you scuff your bumper as you pull into your garage at home.
Whatever the reason for the fresh scratch on your bumper, it doesn’t change the fact that your car’s bumper is now an eyesore that’s frustrating you. A scuff or scratch on your bumper is annoying to behold, and there’s a reason why so many cars on the road have this damage. Scratches and scuffs are minor damage that insurance companies don’t like to pay out to repair.
If you call your insurer and ask them to cover the cost, the chances are that they’ll hit you with an excess that’s more than the value of the repair. The insurance company is also likely to increase your monthly premium. These facts mean that it’s just not worth it to submit a claim to the insurance, and it’s the reason why so many car bumpers have scuffs or scratches that their owners refuse to repair.
However, if you’re a conscientious car owner, that scuff or scratch is eating away at your mind every time you step into your car. There’s nothing worse than buying a new car and scuffing the bumper in the first few months of ownership. This kind of damage is merely irritating and detracts from the visual effect, especially if it’s a new car.
So, how do you repair the scuff or scratch, without spending a fortune? Here’s a brief guide of everything you need to know about restoring your bumper to its former glory.
Assess the Damage
Before you rush out and spend money on restoration tools and equipment to repair the scuff or scratch, you need to examine the damage properly. Many people may view a scuff or scratch as a minor cosmetic problem. However, the reality is that there could be damage that’s not entirely visible on the surface.
Check how your bumper lines up to the panel. Even a small scuff or bump can dislodge the grommets and plugs that attach your bumper to the frame or body. If you notice that it’s of alignment, this is a job for a panel beater workshop, not a DIY fix.
Make sure that you note the depth and severity of damage; there’s a difference between the two types. Scuffs are minor damage where the outside of the bumper makes contact with another surface leaving minor, shallow marks across the bumper. Some scuffs are easy to buff out with a cloth and a bit of abrasive polish, while others may require more work to fix.
A scratch occurs when another surface or object penetrates the bumper. As with scuffs, they vary in severity. You may be able to get away with repairing the bumper without the need for filler if the scratch isn’t too severe.
After assessing the damage, it’s time to prepare your tools to get the job done.
The Tools of the Trade – What You Need to Repair Scuffs and Scratches
Visit your online retailer and purchase the following;
- 80 and 40-grit sandpaper for stripping.
- 500 and 600-grit sandpaper for finishing.
- Rubbing alcohol, and abrasive cleaner or stripper.
- Utility blades.
- Black Body filler (for deep scratches.)
- High-quality black bumper polish.
- Polishing rags (microfiber works best.)
Once your products arrive, it’s time to get to work.
A Step-by-Step Process to Restoring Your Bumper
The majority of scuffs and scratches are easy to fix without removing the bumper from the vehicle. However, if the damage is in a hard-to-reach spot, you may have to remove the bumper. In this case, it’s best to follow the manufacturer guidelines in your owner’s manual or send the car to the body shop for repair.
Step 1- Sand It Down (Deep scratches)
Dip your 40-grit sandpaper in some rubbing alcohol and sand down all of the sharp areas of the scratch until smooth. After that, use the 40-grit to clean up the rough edges left by the 80-grit sandpaper.
Step 2 – Fill it Up (Deep Scratches)
Mix up some black body filler following the product guidelines. Apply the putty to the scratch until the damage is no longer visible. Use a utility blade to remove the excess, and then wait for it to dry and cure completely before following the next step.
Step 3 – Sand it Down (Deep Scratches and Scuffs)
Use the 80-grit sandpaper to sand down the putty till its smooth and conforms to the contour of the bumper. This step also applies to scuffs. The idea is to create a surface that has shape and lines that match the rest of the bumper. After stripping and contouring, use the 400-grit with some water to produce a smooth surface. Refine the surface further with the 600-grit water paper.
Step 4 – Dry and Eye
Wait until the surface is cured and assess your work. Make sure that the bumper looks neat and there’s no bumps or excess filler in any area.
Step 5 – Buff it Out
Take your black body polish and apply it to the repair surface using a microfiber cloth to prevent further scratching or scuffs. Choose a buffing product that contains nano-polymer additives to ensure a lasting shine on the surface. It’s critical to use a premium-quality product that provides a showroom finish and lasts for a minimum of 6-months between applications.
Step 6 – Admire Your work
After finishing the buff, step back and admire your work, your bumper will look as good as new.
Frequently Asked Questions
How do you restore a black bumper?
How you restore a black bumper depends very much on the extent of the damage.
Deep scratches and scuffs should be sanded down and carefully filled with black body filler. And when dry, you should take to the bumper with some black body polish and a microfiber cloth.
That’s the short answer to the question anyway. For a more in-depth answer, please scroll back up, since this is where we will list all the products that you’ll need to buy to repair scuffs and scratches on car bumpers.
And then we set out a step-by-step process for restoring your bumper, from treating the damage right the way through to making it look great again.
The trick to getting the best results is to sand the putty down to conform to the contour of the bumper. And then at the end, buffing it out with a polish that contains nano-polymer additives.
Does WD 40 remove scratches?
You’ll be pleased to hear that WD40 can be used to treat bumper scratches, especially the lighter ones that aren’t too deep.
When you spray WD40 over scratches the oil fills in the gaps. However, it’s important to note at this point that it will leave a shiny glossy finish. So, unless you decide to buff the whole of the bumper, you could end up making the scratches stand out more.
Therefore, we would argue that if you do decide to use WD40 as a filler for your bumper’s scratches, you should then follow that up with a buffing job.
We mentioned it earlier, but it bears repeating. The best way to buff out your bumper after filling the scratches in is to use a premium quality buffing product that contains nano-polymer additives. That way you can be sure of getting a showroom finish that will last for at least the next 6 months.
Can toothpaste remove scratches from plastic?
You’ll be pleased to hear that you can use toothpaste to remove minor and shallow scratches from most hard plastics.
But it’s important to note that this requires the right kind of toothpaste. A gel toothpaste won’t achieve the desired effect, but a regular toothpaste should fair just fine.
This is because regular toothpaste has a minor grit to it which helps to buff out the scratches. But a better toothpaste to use would be whitening toothpaste because it is more abrasive.
What you need to do is to apply a thin coating of the toothpaste using a soft cloth. Then you should rub the toothpaste in using a circular motion, before rinsing clean.
But if the plastic you want to restore has deeper scratches, then, unfortunately, toothpaste, of any kind, is not going to be up to the job, and you will have to try something else instead.
Can you polish plastic bumpers?
You can polish plastic bumpers. And the good news is that it’s easier than you might think. It just requires buying the right product for the job. Let’s lay it out for you.
Car bumpers are typically matt rather than glossy, but if you were to buy the right products, you could give your car bumpers a really nice shine.
As we mentioned earlier in the article, you can use black body polish on your car bumpers.
First, you buy a black body polish that contains nano-polymer additives. Then you apply it to the bumper using a microfiber cloth. This serves to prevent future scratches and scuffs.
Once complete, you’ll be left with a shiny finish that wouldn’t look out of place in a car showroom.
And by ensuring the polish contains nano-polymer additives, you can expect the shine to last an entire 6 months at the very least.
How do you restore a GREY plastic bumper?
To restore a faded grey bumper back to its original color, you will first need to remove any dirt and grease, make sure it’s dry, and then recolor the bumper using a sponge applicator for an even coating.
And if you use the right product, you can get a really good dark finish in just 5 to 30 minutes.
However, if the plastic bumper has seen a lot of UV damage and has become bleached, you would be well advised to apply additional coats of color until you get the result you want.
But before you do that, it’s worth thinking about whether you’d prefer the plastic bumper to look black, since this color is more readily available and affordable.
But you don’t have to black if that’s not for you. And recoloring is a very easy and straightforward process whatever recoloring product you decide to use.
A Final Thought
This repair technique will work for all other black plastic trim on your car, as well as other vehicles such as motorbike plastics, and boat trim. Follow the guidelines and restore your vehicle to its former glory!








No Comment