


DIY Guide to Fixing the Most Common Car Issues

Introduction to Common Car Issues
If your check engine light comes on, don’t panic. It could indicate something as simple as a loose gas cap or a more serious issue, but either way, you’ll want to get it checked out. The most common causes for the check engine light are:
- A faulty sensor: Things like oxygen sensors, mass air flow sensors, and crankshaft position sensors fail over time and can trigger the light. An auto parts store can scan for the code to determine the specific sensor.
- Faulty fuel injector: Fuel injectors spray fuel into the cylinders, and a clogged or failing injector will activate the light. This can reduce performance and fuel economy.
- Loose or broken gas cap: A loose or missing gas cap allows fuel vapors to escape, triggering the light. Replace or tighten the cap and the light should turn off within a few days of driving.
- Catalytic converter issue: The catalytic converter controls emissions, and problems like a failing or clogged converter will illuminate the check engine light. Expensive to replace but important for the environment and passing emissions tests.
Other possibilities include a malfunctioning thermostat, dirty air filter, or spark plugs needing replacement. The good news is many common issues are relatively easy DIY fixes or inexpensive repairs at your local mechanic. The key is to have the specific trouble code scanned as soon as possible to determine the problem and solution to get your vehicle—and your bank account—back on the road.
Regular maintenance like oil changes, tune-ups, and tire rotations are the best ways to avoid surprise check engine lights. But rest assured, with some diagnosis and TLC, you’ll have your trusty companion back in working order in no time.
Checking and Changing Your Engine Oil

Checking and changing your engine oil is one of the easiest ways to keep your vehicle running well. If you’re not mechanically inclined, don’t worry – this is something anyone can do!
Gather Your Supplies
First, you’ll need to get the right oil for your vehicle’s engine. Check your owner’s manual to find the correct oil type and capacity. You’ll also want:
- A wrench or socket to remove the oil drain plug
- An oil filter wrench
- Rags or paper towels
- An oil pan to catch the drained oil
Locate the Oil Drain Plug and Filter
The oil drain plug is at the bottom of the oil pan under your car. Place the oil pan underneath it to catch the drained oil. The oil filter is usually near the oil pan – it’s a cylindrical object that screws on.
Drain the Old Oil
Loosen and remove the oil drain plug using the wrench and let the oil drain from the engine into the pan. This typically takes 30 minutes.
Change the Oil Filter
Use the oil filter wrench to unscrew the old filter counterclockwise. Apply a thin coat of new oil to the rubber gasket on the new filter and screw it on clockwise by hand. Tighten about 3/4 to 1 full turn after the gasket first contacts the oil filter base.
Refill with New Oil
Replace the oil drain plug and tighten securely. Open the oil filler cap on top of the engine, and pour in the new oil through the opening. Check the dipstick to ensure it’s filled to the correct level. Start the engine and check for leaks. Let it run for a few minutes. Shut off the engine and recheck the oil level with the dipstick. Add oil if necessary.
Congrats, you did it! By routinely changing your oil every 3,000 to 7,500 miles depending on your vehicle and driving conditions, your engine will last much longer and run more efficiently. You’ve got this!
Replacing Your Car’s Air Filter
Replacing your air filter is one of the easiest DIY fixes you can do to keep your car running well. A clean air filter means better gas mileage and performance. It’s a cheap fix that can save you money in the long run.
What You’ll Need
To replace your air filter, you’ll need:
- A new air filter that matches your vehicle’s specifications
- A screwdriver or wrench to open your air filter housing
- Work gloves (optional)
- Replacement air filter (you can find these at any auto parts store)
Locating the Air Filter
Your air filter will be in a large, oblong box in your engine bay. It’s typically near your engine’s air intake. Check your owner’s manual for the exact location and specifications for your vehicle make and model.
Removing the Old Filter
- Park your car on a level surface and turn off the engine. Allow the engine to cool for at least 30 minutes.
- Loosen the screws or bolts on the air filter housing with your screwdriver or wrench and lift off the lid.
- Remove the old, dirty air filter. It may come out easily by hand, or you may need to gently pry it out with a flathead screwdriver. Make sure not to rip or damage the filter.
-Wipe down the inside of the air filter housing with a damp cloth to remove any excess dirt or debris.
Installing the New Filter
- Place the new air filter into the housing with the airflow arrow pointing in the direction of the engine. The arrow shows the direction the filter is designed to filter air.
- Put the lid back on the air filter housing and tighten the screws or bolts.
- Start your vehicle and check to make sure the new air filter is secure and fitted properly. There should be no rattling sounds coming from the engine bay.
- Drive your vehicle around for at least 10-15 minutes to allow the new air filter to settle in. Your engine and fuel economy performance should improve noticeably once the new, clean air filter has been installed.
- Be sure to change your air filter every 12,000 to 15,000 miles to keep your engine running strong. A clean air filter and regular maintenance will help keep your vehicle on the road for years to come.
Checking and Filling Coolant Levels
Checking and filling your coolant levels is an easy DIY task that can help prevent overheating and other engine damage. Coolant, also known as antifreeze, circulates through your radiator and engine to regulate temperature.
Low coolant levels can lead to an overheated engine, so check your coolant reservoir regularly and refill as needed. The coolant reservoir will be a translucent plastic tank, typically near the radiator, with “coolant” or “antifreeze” markings. Check the coolant level with the engine cold for the most accurate reading.
Locating the Coolant Reservoir
Open your hood and locate the coolant reservoir, which will be a translucent plastic tank near the radiator. It may be labeled “coolant” or have the antifreeze symbol on it, which looks like a temperature gage. On most vehicles, the coolant reservoir can be found along the firewall in the engine bay.
Checking Coolant Levels
Look at the side of the coolant reservoir—you should see high and low level markings. The coolant level should be between these two marks when the engine is cold. If the level is at or below the “low” mark, it’s time to add more coolant.
Adding Coolant
Before adding coolant, check your vehicle’s manual to determine the correct coolant type. The most common types are ethylene glycol and propylene glycol. Adding the wrong type can damage your engine.
With the engine cool, slowly pour coolant into the reservoir until it reaches the proper level. Do not overfill. Replace the reservoir cap and you’re done! Start the engine and check levels again once it reaches operating temperature. Add coolant if necessary.
Be sure to have your coolant system pressure tested periodically to check for any leaks or other issues. Coolant, like many automotive fluids, breaks down over time and needs to be flushed and refilled as recommended in your owner’s manual, typically every 2-5 years depending on the type.
Keeping your coolant at the proper level and having the system serviced regularly are two of the easiest ways to avoid overheating, help your vehicle run efficiently, and prolong the life of your engine. Check it and fill it—you’ve got this!
Changing a Flat Tire
A flat tire is one of the most common car issues, but the good news is you can easily fix it yourself. Here’s how to change a flat tire in a few easy steps:
Park on a level surface
Pull over to a safe, flat area. Engage the parking brake and turn on your hazard lights for visibility.
Get the jack and spare tire
The jack and spare tire are usually located in the trunk. If not, check your owner’s manual for the correct location.
Loosen the lug nuts
Lug nuts are the bolts that secure the wheel to the wheel hub. Loosen the lug nuts on the flat tire, but do not remove them yet. Only loosen them about 1/2 turn before jacking up the car.
Position the jack
The jacking points are the reinforced areas of the frame designed specifically for the jack. Consult your owner’s manual to find the jacking points for your specific vehicle make and model.
Raise the jack
Raise the jack until the flat tire is just off the ground. Double check that the jack is stable and secure before going under the vehicle.
Fully remove the lug nuts
Finish removing the lug nuts and set aside. Remove the flat tire and put the spare tire on the lug bolts.
Hand-tighten the lug nuts
Align the spare tire and hand-tighten the lug nuts.
Lower the jack
Lower the jack until the tire is on the ground, then remove the jack.
Tighten the lug nuts
Tighten the lug nuts in a star or criss-cross pattern with the lug wrench.
Replace tools and spare
Replace the jack, lug wrench, and flat tire in their proper storage locations in your vehicle. Have the flat tire repaired or replaced as soon as possible.
Changing a flat yourself can save time and money. With the right tools and technique, you’ll be back on the road in no time. Let me know if you have any other questions!
Replacing Windshield Wipers
When your windshield wipers start streaking, chattering or not cleaning effectively, it’s time to replace them. Windshield wipers are critical for safe driving in bad weather, so don’t put off fixing them. Replacing your wipers is an easy DIY job that only takes a few minutes.
Buy the right wipers
Head to your local auto parts store and buy a pair of replacement wipers that match your vehicle’s make, model and year. You’ll have options like conventional rubber, beam blade or hybrid wipers – beam blade or hybrid wipers typically last longer and perform better. For most cars, you’ll pay between $10 to $30 per wiper.
Park on level ground

Park your car on a flat, level surface and turn off the engine. Allow the wiper arms to cool completely if you’ve just been driving. Engage the emergency brake for safety.
Lift the wiper arm
Lift one wiper arm at a time from the windshield to access the wiper mounting bolt or clip underneath. The arm may be stiff, so you may need to use a wrench or pliers to pry it up. Be very careful not to break the windshield glass.
Remove the old wiper
Once you have access, remove the bolt, nut or clip holding the old wiper to the wiper arm. these can typically be unscrewed or unclipped by hand, but again use pliers if needed. Remove the old wiper from the arm.
Attach the new wiper
Attach one end of the new wiper to the wiper arm using the bolt, nut or clip and hand-tighten. Repeat the same steps for the other wiper arm and new wiper.
Test and tighten
Gently lower both wiper arms back onto the windshield. Sit in the driver’s seat and turn the wipers on to ensure they are secure and functioning properly without any streaking or chattering. Tighten the bolts firmly with the pliers or wrench.
You now have a clear view of the road ahead thanks to your handy work. Drive safely!
Replacing Brake Pads
When your brake pads become worn down, it’s important to replace them to ensure safe braking and handling of your vehicle. Replacing your brake pads is something you can do yourself to save money versus paying a mechanic. Here’s how:
Gather the necessary supplies
You’ll need basic tools like a lug wrench, socket set, C-clamp, brake pad spreader tool, and protective gloves. Purchase semi-metallic or ceramic brake pads that match your vehicle make and model.
Loosen the lug nuts
With the tires still on the ground, loosen the lug nuts on one wheel at a time using the lug wrench.
Jack up the vehicle
Place the jack under the vehicle according to the owner’s manual. Jack up one side of the vehicle at a time and secure it with jack stands for safety. Remove the wheels.
Compress the caliper piston
Find the caliper on one side of the rotor. The caliper pistons will need to be compressed to fit over the new, thicker brake pads. Use the C-clamp to slowly compress the piston into the caliper. Repeat on the other side.
Remove the old brake pads
Use the brake pad spreader tool to pry out the old brake pads from the caliper. Clean the caliper and caliper bracket with brake parts cleaner or rubbing alcohol.
Install the new brake pads
Slide the new brake pads into the caliper, with the friction material facing the rotor. The brake pads should move freely in the caliper.
Reassemble and repeat
Put the caliper back over the rotor, reinstall the wheel, and hand-tighten the lug nuts. Repeat the same steps for the other side.
Tighten the lug nuts
Once both sides are done, lower the vehicle to the ground. Tighten the lug nuts in a star or criss-cross pattern with the socket wrench.
Test and break in
Take the vehicle for a test drive with light braking to ensure proper operation before aggressive braking. This helps transfer brake pad material to the rotor surface, maximizing braking performance. Your brake pads are now ready to go!
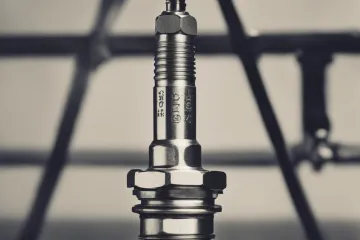
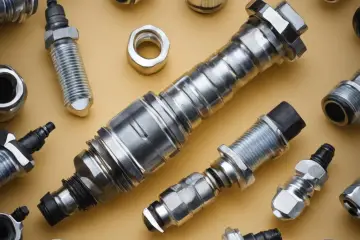
Checking and Replacing Spark Plugs
Checking and replacing your spark plugs is one of the most common DIY fixes for engine issues. Spark plugs provide the spark to ignite the air/fuel mixture in your engine’s combustion chambers. Over time, spark plugs can become dirty or worn down, disrupting this process and reducing engine power and performance.
When to Check Your Spark Plugs
If your engine is misfiring, hard to start, or lacking power, it’s a good idea to check your spark plugs. As a general rule of thumb, most spark plugs need to be replaced every 30,000 to 90,000 miles depending on the vehicle and spark plug type. Check your owner’s manual for the recommended interval for your specific vehicle.
Removing the Old Spark Plugs
Start by locating the spark plugs under the hood. They’ll be positioned at the top of the engine, either in a row along the sides of the valve cover or in a circle surrounding the combustion chamber. Loosen and remove each spark plug using a spark plug socket and wrench, turning counterclockwise. Be very careful not to drop anything into the open spark plug wells.
Choosing New Spark Plugs
Purchase new spark plugs that match your vehicle’s specifications. The proper spark plug type and heat range can be found in your owner’s manual. As a general rule, choose a spark plug with a heat range equal to or slightly hotter than the factory spark plug. This helps prevent fouling. Iridium or platinum-tipped spark plugs typically last longer than standard copper spark plugs.
Installing the New Spark Plugs
Screw in each new spark plug by hand to avoid cross-threading, then tighten with the spark plug wrench. Tighten to the torque specification in your manual, usually around 15 to 30 foot-pounds for most spark plugs. Put everything back together, start the engine, and test drive your vehicle. The new spark plugs should restore power and performance. Be sure to check for any error codes with an OBD2 scanner to ensure no other issues need to be addressed.
With some basic tools and a little mechanical know-how, you can save money by replacing your own spark plugs. Be patient and take your time—your engine will thank you!
Common Car Issues FAQ
DIYers rejoice—many common car issues can be easily fixed yourself. Here are some of the most frequent questions and problems you may encounter, along with the basics on how to remedy them.
Why is my check engine light on?
The check engine light means your vehicle’s on-board diagnostics system (OBD-II) has detected a malfunction. It could be something minor, but it’s best to have the code scanned to determine the cause. You can get the OBD-II scan done for free at an auto parts store. Once you know the code, you may be able to fix the issue yourself. Common reasons for the check engine light include:
- Loose or faulty gas cap: Tighten or replace your gas cap. The light should go off after a few drive cycles.
- Faulty oxygen sensor: Oxygen sensors monitor your engine’s air-fuel mixture. Replace the faulty sensor.
- Faulty catalytic converter: The catalytic converter reduces vehicle emissions and needs to be replaced by a mechanic.
Why are my brake lights not working?
If one or more brake lights are out, it’s usually due to a blown fuse or bulb. Check your vehicle’s fuse box for the brake light fuse. If it’s blown, replace it. If the fuses are fine, the bulb itself may need replacement. Brake light bulbs can often be purchased at an auto parts store for a few dollars. You may need to remove some interior trim panels to access the bulb. Be very careful not to break any plastic clips. Replace the bad bulb, test the new one, then reinstall all trim panels.
What’s that squealing noise when I brake?
A squealing noise when braking usually means your brake pads need replacement. Brake pads wear down over time and miles driven. Once they reach a certain thickness, they start to squeal as a warning they will soon need replacement. It’s best to have the brake pads replaced promptly by a certified mechanic to avoid damage to your brake rotors. They can also inspect your brake system to ensure there are no other issues.
With some basic tools and patience, you can fix many common car problems yourself. But for safety systems or if you feel out of your depth, don’t hesitate to have your vehicle checked by a trusted mechanic. It’s always better safe than sorry!
Conclusion
So there you have it, a handy DIY guide to tackle some of the most common car troubles without needing a mechanic. Now you’ll be prepared the next time your check engine light comes on or your battery dies. You’ve got the knowledge and skills to handle it yourself, saving time, money, and stress. Pretty soon your friends and family will be asking you to help them fix their car issues too! While some repairs are best left to the professionals, it’s empowering to understand your vehicle better and feel capable of handling these types of common problems on your own. With the right tools and patience, you can do it. Good luck and happy fixing!


No Comment